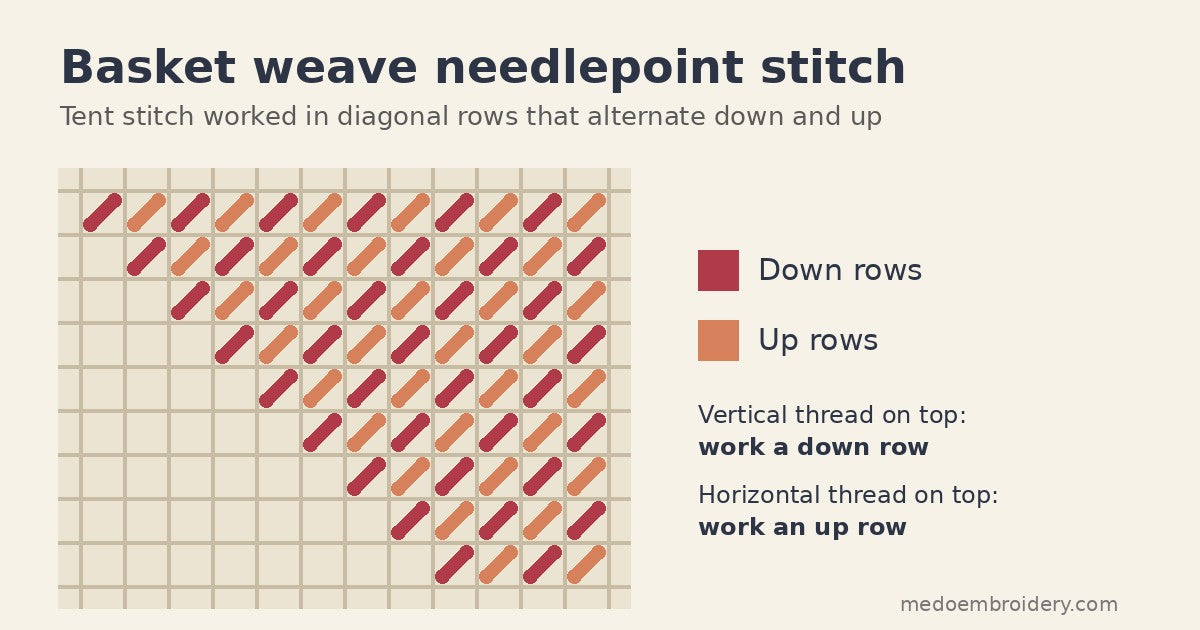
The basket weave stitch is a needlepoint tent stitch worked in diagonal rows instead of straight rows. On the front it looks the same as continental stitch: small slanted stitches over one canvas intersection. On the back it forms a woven, basket-like pattern. It pulls the canvas out of shape far less than continental stitch, which makes it the standard choice for filling backgrounds and large areas.
Basket weave vs continental vs half cross
| Stitch | Worked in | Back of canvas | Canvas distortion | Best for |
|---|---|---|---|---|
| Basket weave | Diagonal rows | Woven grid, well padded | Very little | Backgrounds, large areas |
| Continental | Horizontal or vertical rows | Long slanted stitches | Pulls into a diamond shape | Single lines, outlines, small areas |
| Half cross | Horizontal rows | Short vertical stitches | Little, but thin coverage | Quick work on penelope or interlock canvas |
What you need
- Mono canvas, 13 or 18 mesh, taped on the edges
- A tapestry needle: size 18 for 13 mesh, size 22 for 18 mesh
- Wool, cotton floss or another needlepoint thread thick enough to cover the canvas
- Stretcher bars or a scroll frame, recommended
How to work the basket weave stitch
- Start in the upper right corner of the area. Bring the needle up and make one slanted stitch over one intersection, from lower left to upper right.
- Work the first diagonal row going down. Each new stitch sits one step down and to the left. The needle travels behind the canvas vertically, from the top of one stitch down to the start of the next.
- At the end of the row, turn and work the next diagonal row going up. The needle now travels behind the canvas horizontally.
- Fit the new row into the gaps left by the previous one, so the stitches interlock.
- Keep alternating down rows and up rows until the area is filled.

The rule that keeps rows straight
Mono canvas is woven with threads that pass over and under each other. Look at the intersection where the next row starts:
- If a vertical thread lies on top, work a down row.
- If a horizontal thread lies on top, work an up row.
Stitchers remember it as "down the pole, up the stairs." Following the weave stops ridges from forming on the front.
Tips for even basket weave
- Never work two rows in the same direction next to each other. It leaves a visible line on the front.
- If you stop mid-area, park the needle outside the stitched area so you remember the direction of the next row.
- Keep tension relaxed. Basket weave already resists distortion, and tight stitches make the canvas show through.
- Use continental stitch for single-stitch outlines and small details, then fill around them with basket weave.
- Start and end threads by weaving under the back of finished rows rather than with knots.
Does basket weave use more thread?
It uses about the same amount as continental stitch and more than half cross stitch. Basket weave and continental both cover the back as well as the front. That padding makes finished pieces like pillows, belts and key fobs harder wearing.
Frequently asked questions
Is basket weave the same as tent stitch?
Basket weave is one way to work tent stitch. Continental and half cross are the other two. All three look alike from the front.
Can you do basket weave on plastic canvas?
Yes, but plastic canvas does not distort, so the main benefit is the padded back rather than keeping the shape square.
Why does my basket weave show diagonal lines?
Two neighboring rows were worked in the same direction. Unpick one row and rework it in the opposite direction.
Is basket weave good for beginners?
Yes. It takes a few rows to get the rhythm, but it is the stitch most needlepoint teachers recommend learning first for backgrounds.
Keep learning needlepoint
Start from the beginning with how to needlepoint, then try other textures in our guide to needlepoint stitches. Curious how needlepoint differs from other techniques? Read what is embroidery.
Looking for a handmade-style gift? Browse personalized embroidered gifts.